Azure PowerTip 2: So what exactly is “Classic Azure”, “V1”, V2” and “ARM”?
Especially Azure beginners often struggle with the differences between the classic deployment model in Azure and the Azure Resource Manager (ARM) model. This posts explains the differences from my point of view. Have fun reading.
So what is “classic” and what is “ARM”?
As you might or might not know, there are two different deployment models in Azure.
There is the “classic” mode also known as “v1” or even “Azure Service Manager (ASM)”
And on the other hand, there is the “Azure Resource Manager (ARM)” mode, also referred to as “v2”.
What is “classic” Azure?
Classic Azure is tied to the “old” or better “classic” Azure Portal that can be found at: https://manage.windowsazure.com/

In the beginning of Azure the navigation pane on the left side only contained a couple of services. However, as the Azure team started pushing out more and more services, the list got larger and larger and is nowadays too big to fit on a single screen.
The real problem presented itself when you created a larger Azure application. This application often consisted of multiple components, such as WebSites, Virtual Machines, Networks, Storage Accounts, Containers, Service Bus stuff and so on. So far so good. However, you got into big trouble as soon as you had several larger applications in the same subscription. Keeping components of the two applications separate was up to the developer. That meant defining and sticking to naming conventions to separate stuff. Naming is really hard. This just couldn’t work. Monitoring and billing Azure applications in a large enterprise with multiple tenants was a nightmare.
On the camera front, the device sports a 13-megapixel rear camera coupled Smartphones Below Rs 15000 with an 8-megapixel front-facing camera alone with front flash
In addition, finding components of your application was really hard. Because everything was ordered by the type (WebSites, Storage, Sql Databases) the components of the different applications got really mixed up.
What is ARM?
ARM or Azure Resource Manager is the concept that was introduced together with the new Azure Portal that you can find under: http://portal.azure.com
The official resource manager documentation can be found here:
https://azure.microsoft.com/en-us/documentation/articles/resource-group-overview/

The new ARM deployment model introduced the concept of resource groups. resource groups are logical containers that contain your Azure components and services. The picture below shows one of my applications that contains a total of nine different components, such as API Apps, a mobile app, a Logic App, a database and an Application Insights instance. The idea is that we can now group these components into a resource group called “mmemobileapps”. When we enter the portal we can just open our resource group “mmemobileapp” and have all our stuff at hand. This makes it possible to have several Azure applications consisting of different components and services and avoid having a total mess in the end. Every resource in Azure can only be assigned to one single resource group.

But there are more benefits!
Resource groups provide us with a common view to all the resources they contain. For example the costs of the resources will be billed grouped by resource groups. This added granularity comes in handy when we run multiple application in the same subscriptions and eventually charge people or departments for their apps.
From the resource group blade we can take a look at the costs of all of the resources of our group:

The same common-view-approach holds for other aspects of our resources. The portal shows us a deployment history, where we can see all the deployments that occurred for any of the resources in the group:

Or we can look at the combined view of Audit logs or alerts:

I personally believe that resource groups are one of the best features that have been introduced on the Azure Platform recently. However, resource groups is just one advantage of the ARM model. There are many more:
Everything is Declaration Based
Every resource deployed in ARM is defined in a JSON document. The hierarchy of resources can be examined by going to the Azure Resource Explorer at: https://resources.azure.com/

The column on the left side shows us the entire resource structure that we have in Azure. We start by selecting a subscription, can then navigate to a resource group and find every resource that we can see in the azure portal. On the right hand side we see the JSON that defines the resource. It is possible to directly edit and upload the JSON definition.
REST API
The ARM model is based on a REST API that can be used to create, delete and modify Azure resources. In the Azure Resource Explorer in the picture above we can find the URIs required to access a certain resource and we even have buttons to invoke a GET, POST or PUT request to the API directly from the browser.
This REST API combined with the declarative JSON approach is the holy grail to automation. Once you can define an entire application containing of numerous resources in a text file (which we can thanks to ARM), you can as well deploy it by the click of a button. We are clearly going into the direction of “Infrastructure as Code (IaC)” here!
The documentation for the REST API can be found here:
https://msdn.microsoft.com/en-us/library/azure/dn790568.aspx
Parallelism
The ARM model enables you to deploy resources in parallel. You can now deploy 10 Azure VMs in parallel. Before, this was not possible, no matter which approach you took.
Completely Template Based
Anything that is deployed within ARM is template based. This means that anything you deploy is defined in a JSON template. There is a large number of predefined templates available on GitHub: http://aka.ms/GitHubQuickStart
Security
ARM introduces a new approach to RBAC (Role-Based-Access-Control). Compared to “classic” Azure that just had Owner, Contributor and Reader, with ARM security can be managed with more granularity. For ARM resources it is possible to grant granular rights to single resources or resource groups. Groups will inherit their resource settings down to the resources it contains.
The details about RBAC in Resource Groups can be found here:
https://azure.microsoft.com/en-in/documentation/articles/role-based-access-control-configure/
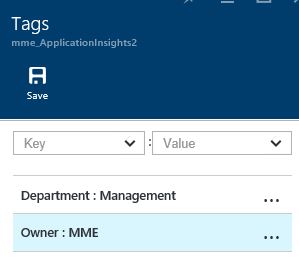
Tags
With ARM, it is possible to add Tags to single resources or resource groups. The tags go through the entire billing process and will show up on your invoice.
Which one Should I Use?
With the Azure platform changing at a high pace, it is often hard to know which resources must be created in “classic” or in ARM. However, the question can easily be answered.
You should always start your work in the new Azure Portal (http://portal.azure.com). If you have the choice to chose between a classic and an ARM resource, which is the case with VMs for example, it is always better to go with the non-classic choice. For resources that have not been migrated to the new deployment model yet, the Azure Portal will automatically redirect you to the classic management portal.
0 Comment